In early 2023, comet C/2023 E3 became a celebrity in the sky. It was a green jewel above us with a tail that changed throughout its journey around the sun. The comet made it closest approach to the Sun on January 12, 2023 and then reached its closest point to Earth on February 1, 2023. In early March, I tried to snap a photo of this comet before it left our view for generations to come.
This first photo is only 4 minutes of exposure time. Essentially it is just one shot of the comet so we can see the comet with the stars in background. You can see how green this comet is!
I wanted to try and get the tail of this comet with a bit more clarity, so the next picture is a stack of 50 two minute exposures. Since the comet is moving so fast through space, when I stack these 50 photos into one final shot, the stars turn into lines. In this photo you can see a second tail extending from the comet as well as a hint of the star trails during the 1 hour and 40 minutes of exposure to obtain the shot.
The equipment and software that I used to process this photo are below
Until the next comet graces our sky, this was a fun one to capture.
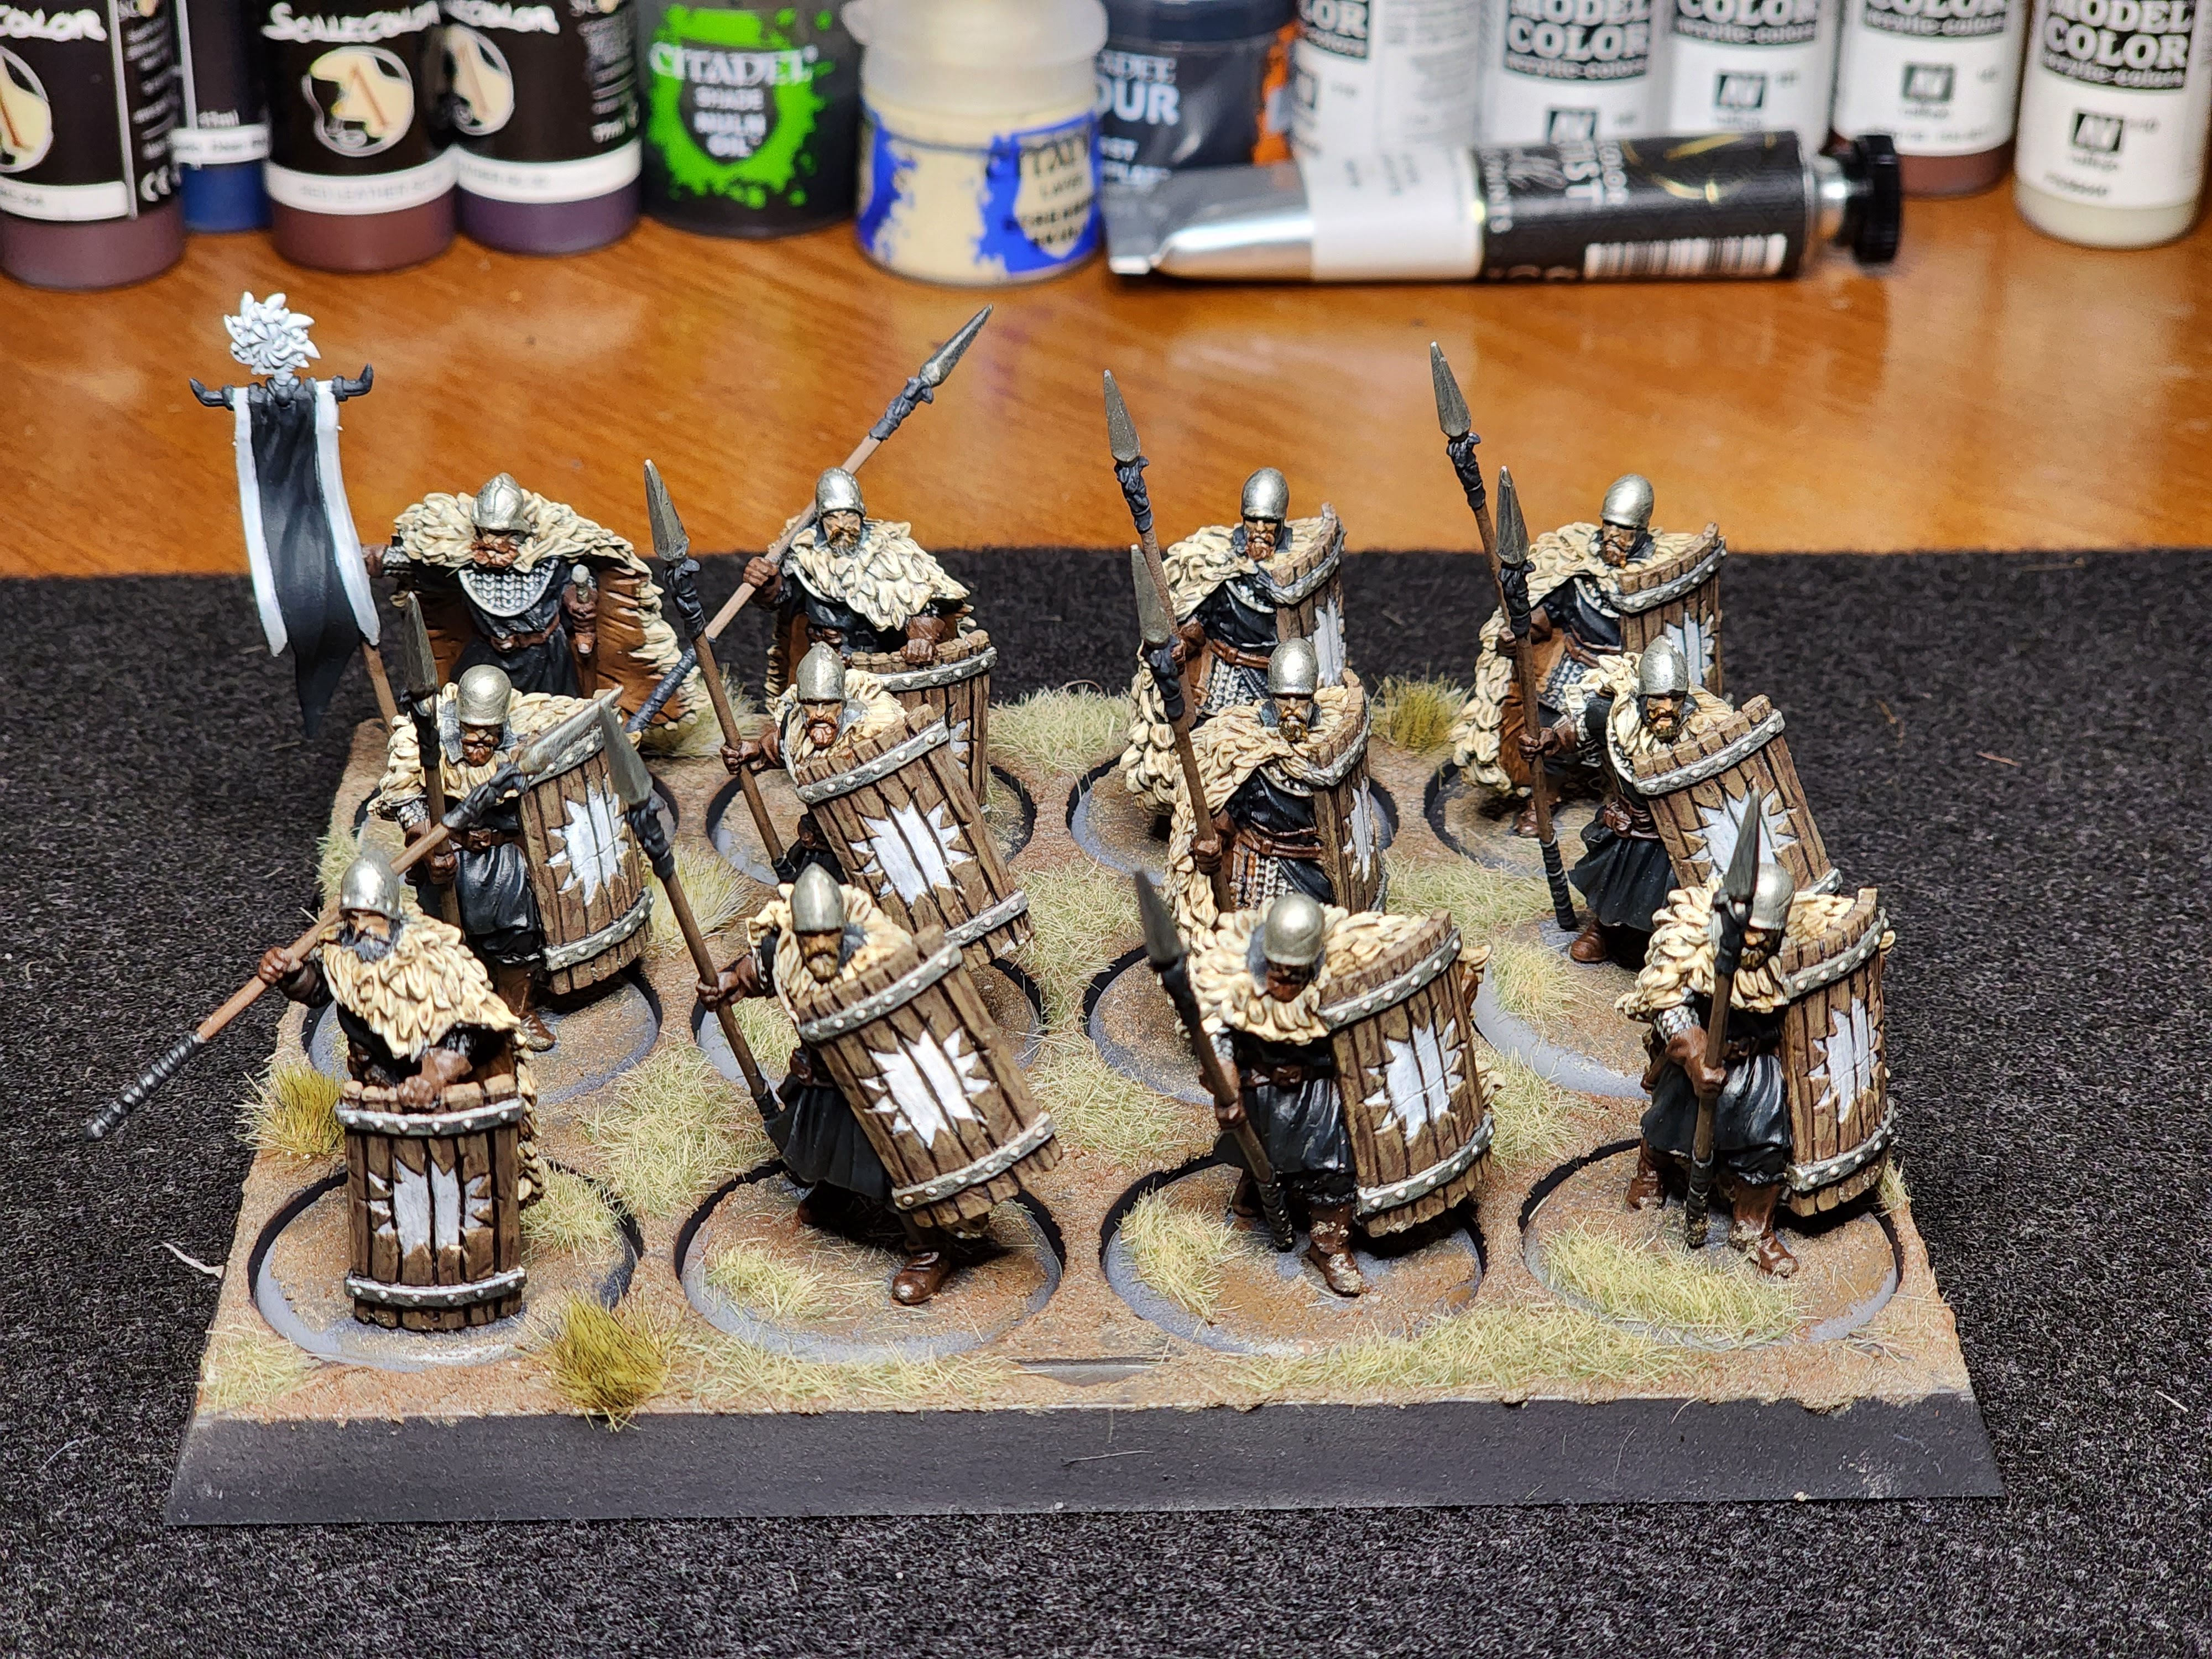
I am continuing to paint miniatures from the game called A Song of Ice and Fire by CMON which is set in the Game of Thrones universe. This is the second set of miniatures from the Starks Starter set I decided to paint. This group of soldiers are called the Karstark Spearmen. The Karstark House has a large white sun as there symbol and I really liked how these minis portrayed that house symbol on each shield.
Here is the final group of solders painted and based. You can go back to the Stark Swordsworn painting guide to see those units.
Over the last couple of years I have started to try my hand at painting miniatures. I have to say that what I thought was going to be daunting has become a very enjoyable hobby. Painting takes so much concentration and yet when you finish a model there is always a great satisfaction in seeing the final product.
There are some master painters out there and I can say I am not one of them. However I so appreciate all the YouTube videos and tutorials available that give inspiration or even instruction on how to paint. I just picked up some new miniatures to paint and thought I would document what I did both to help me remember what I did and to help give back to any painters looking for some ideas.
The miniatures I am showing come from the game called A Song of Ice and Fire by CMON. It is a game set in the Game of Thrones universe. There are a lot of miniatures in the game and I decided to start painting the Starks faction. The starter set for the Starks has a lot of minis just in the starter set so the first one I am trying are the Stark Sworn Swords.
Here is my try at painting the Stark Sworn Sword minis from this starter set. This is a game of armies so many of the minis of the sworn swords are very similar, but I will show a couple of the different models available for these Stark Sworn Swords. Shown also is my very first try at basing miniatures.
The latest area of space that I tried to capture with my telescope is called the "Elephant's Trunk Nebula." In the picture will see what looks like a darker sections that resemble an elephant trunk. Why does it look like this?
Imagine a concentrated area of gas in space and near all that gas is a massive star. The star ionizes that gas and that means we can see that all that gas glowing in the area. Now within that cloud of gas there are pockets of more gas that is super dense. These areas are so dense that even the nearby powerful star cannot penetrate to ionize the gas. That means some of the gas will not appear to be glowing and will instead be dark. The fun part is that that dense area of gas that is protected from ionization forms the shape of an "elephant trunk."
You can easily see this area of gas that is glowing from the largest star in picture. Right in the middle is a shape that resembles an elephant's trunk. That is an area where the gas is so dense that it is protected from ionization. Due to the shape of this dense gas it is commonly called the Elephant's Trunk Nebula.
I took this picture in my backyard and was one of the first times I got to use a light filter called the Optolong L-eXtreme. I was pretty happy with my first use as I do not normally catch as much of the red nebula color like this with only 3 hours of exposure.
The acquisition details for this image were:
The beauty of our heavens never ceases to amaze. Wishing you all clear skies!
Have you ever wondered what our Milky Way galaxy would look like if you saw it edge on? Well look no farther than NGC 891 also sometimes called the Outer Limits Galaxy
I had taken these pictures last winter, but had been working to process them into the final picture seen below. I was using a Celestron Edge 8 telescope and I did not get the most round stars in this outing, however I think the galaxy is just so cool. The picture below is almost 4 hours worth of exposure.
A couple other fun facts about this galaxy are:
It is a spiral galaxy
It is 30 million light years away from us!
It was discovered in Oct 6, 1784 by William Herschel
The galaxy appeared in the end credits of The Outer Limits TV show and thus how it got its nickname.
Here are the acquisition details that I used to get this final image the can also be found on Astrobin.
Some weeks have passed since adding the first couple clown fish to the saltwater tank. I even added a second fish, a yellow watchman goby paired with a pistol shrimp. I love how the shrimp burrows in the sand and the goby sets up guard. It was a great pair to watch and while the goby always had a sour look on his face, I could usually find him standing guard in one of the tunnel openings the pistol shrimp had created. When feeding time came I could usually also find the goby coming to grab some morsels. However after a few days I stopped seeing the watchman goby even though I still heard the pistol shrimp making his popping sound for which he got his name. I looked and looked, even behind my tank fearing he jumped out. A couple weeks passed and I still don't see him so I fear I lost him either from jumping out of the tank or some other unknown reason. I went to my LFS and got another one and he has been doing awesome. It only took a few hours and he was already buddies with the pistol shrimp.
The other thing I have been monitoring lately is the pH in my tank. The pH would go up during the light cycle to around 7.95 and drop to around 7.85 or even lower when the lights went out. I really wanted to try to get the pH up a bit closer to 8.0 or 8.1 as I start to think about adding some coral. The pH a bit closer to 8 and above can be a bit more stable for incoming coral in my past experience.
Here the pH before and after trying to find a simple way to have it trend a little higher.
One of the ways I have seen to get the pH up just a bit is to use a CO2 scrubber. Too much Carbon dioxide gas in the house will get into the water and bring the pH down. Some folks just open a window to bring fresh air in the house and can raise pH. Due to the weather, I will our windows shut most of the time, so the other option is that you can run so air going into your tank through some media that absorbs CO2. If you hook a reactor with CO2 absorbing media to your skimmer then the air in pulled into the skimmer after being scrubbed of CO2 and the "cleaner" air gets mixed into the tank water through the the skimmer.
Bulk Reef Supply has a general media reactor and you can also get CO2 absorbing media to add to the reactor. I added the media to the reactor, and attached plastic tubing to the air inlet valve on the skimmer. Once I turned the skimmer on you can see above the pH has now jumped to over 8.0 in the light cycle and does not tumble quite as much as before at night.
Here is the picture of the setup. The plastic tube that came with the reactor was too big to fit on the skimmer. I could have gotten an adapter, but I found another way was just to push the smaller tube inside of the larger tube. It works for now although i know there is a much more professional solution. The incoming air is pulled through the reactor, C02 is absorbed and the air is fed into the skimmer where it goes into the water from the tank. Since there is less CO2 entering the water, the pH does not dip as much.
Here is the media I use:
One other modification is to have the skimmer itself actually supply the air that goes into the reactor by adding a tube from the "IN" side of the reactor to the collection cup. I have not done this yet, but will probably try in the near future. By having this "closed" system you can get a even better bump in the CO2.
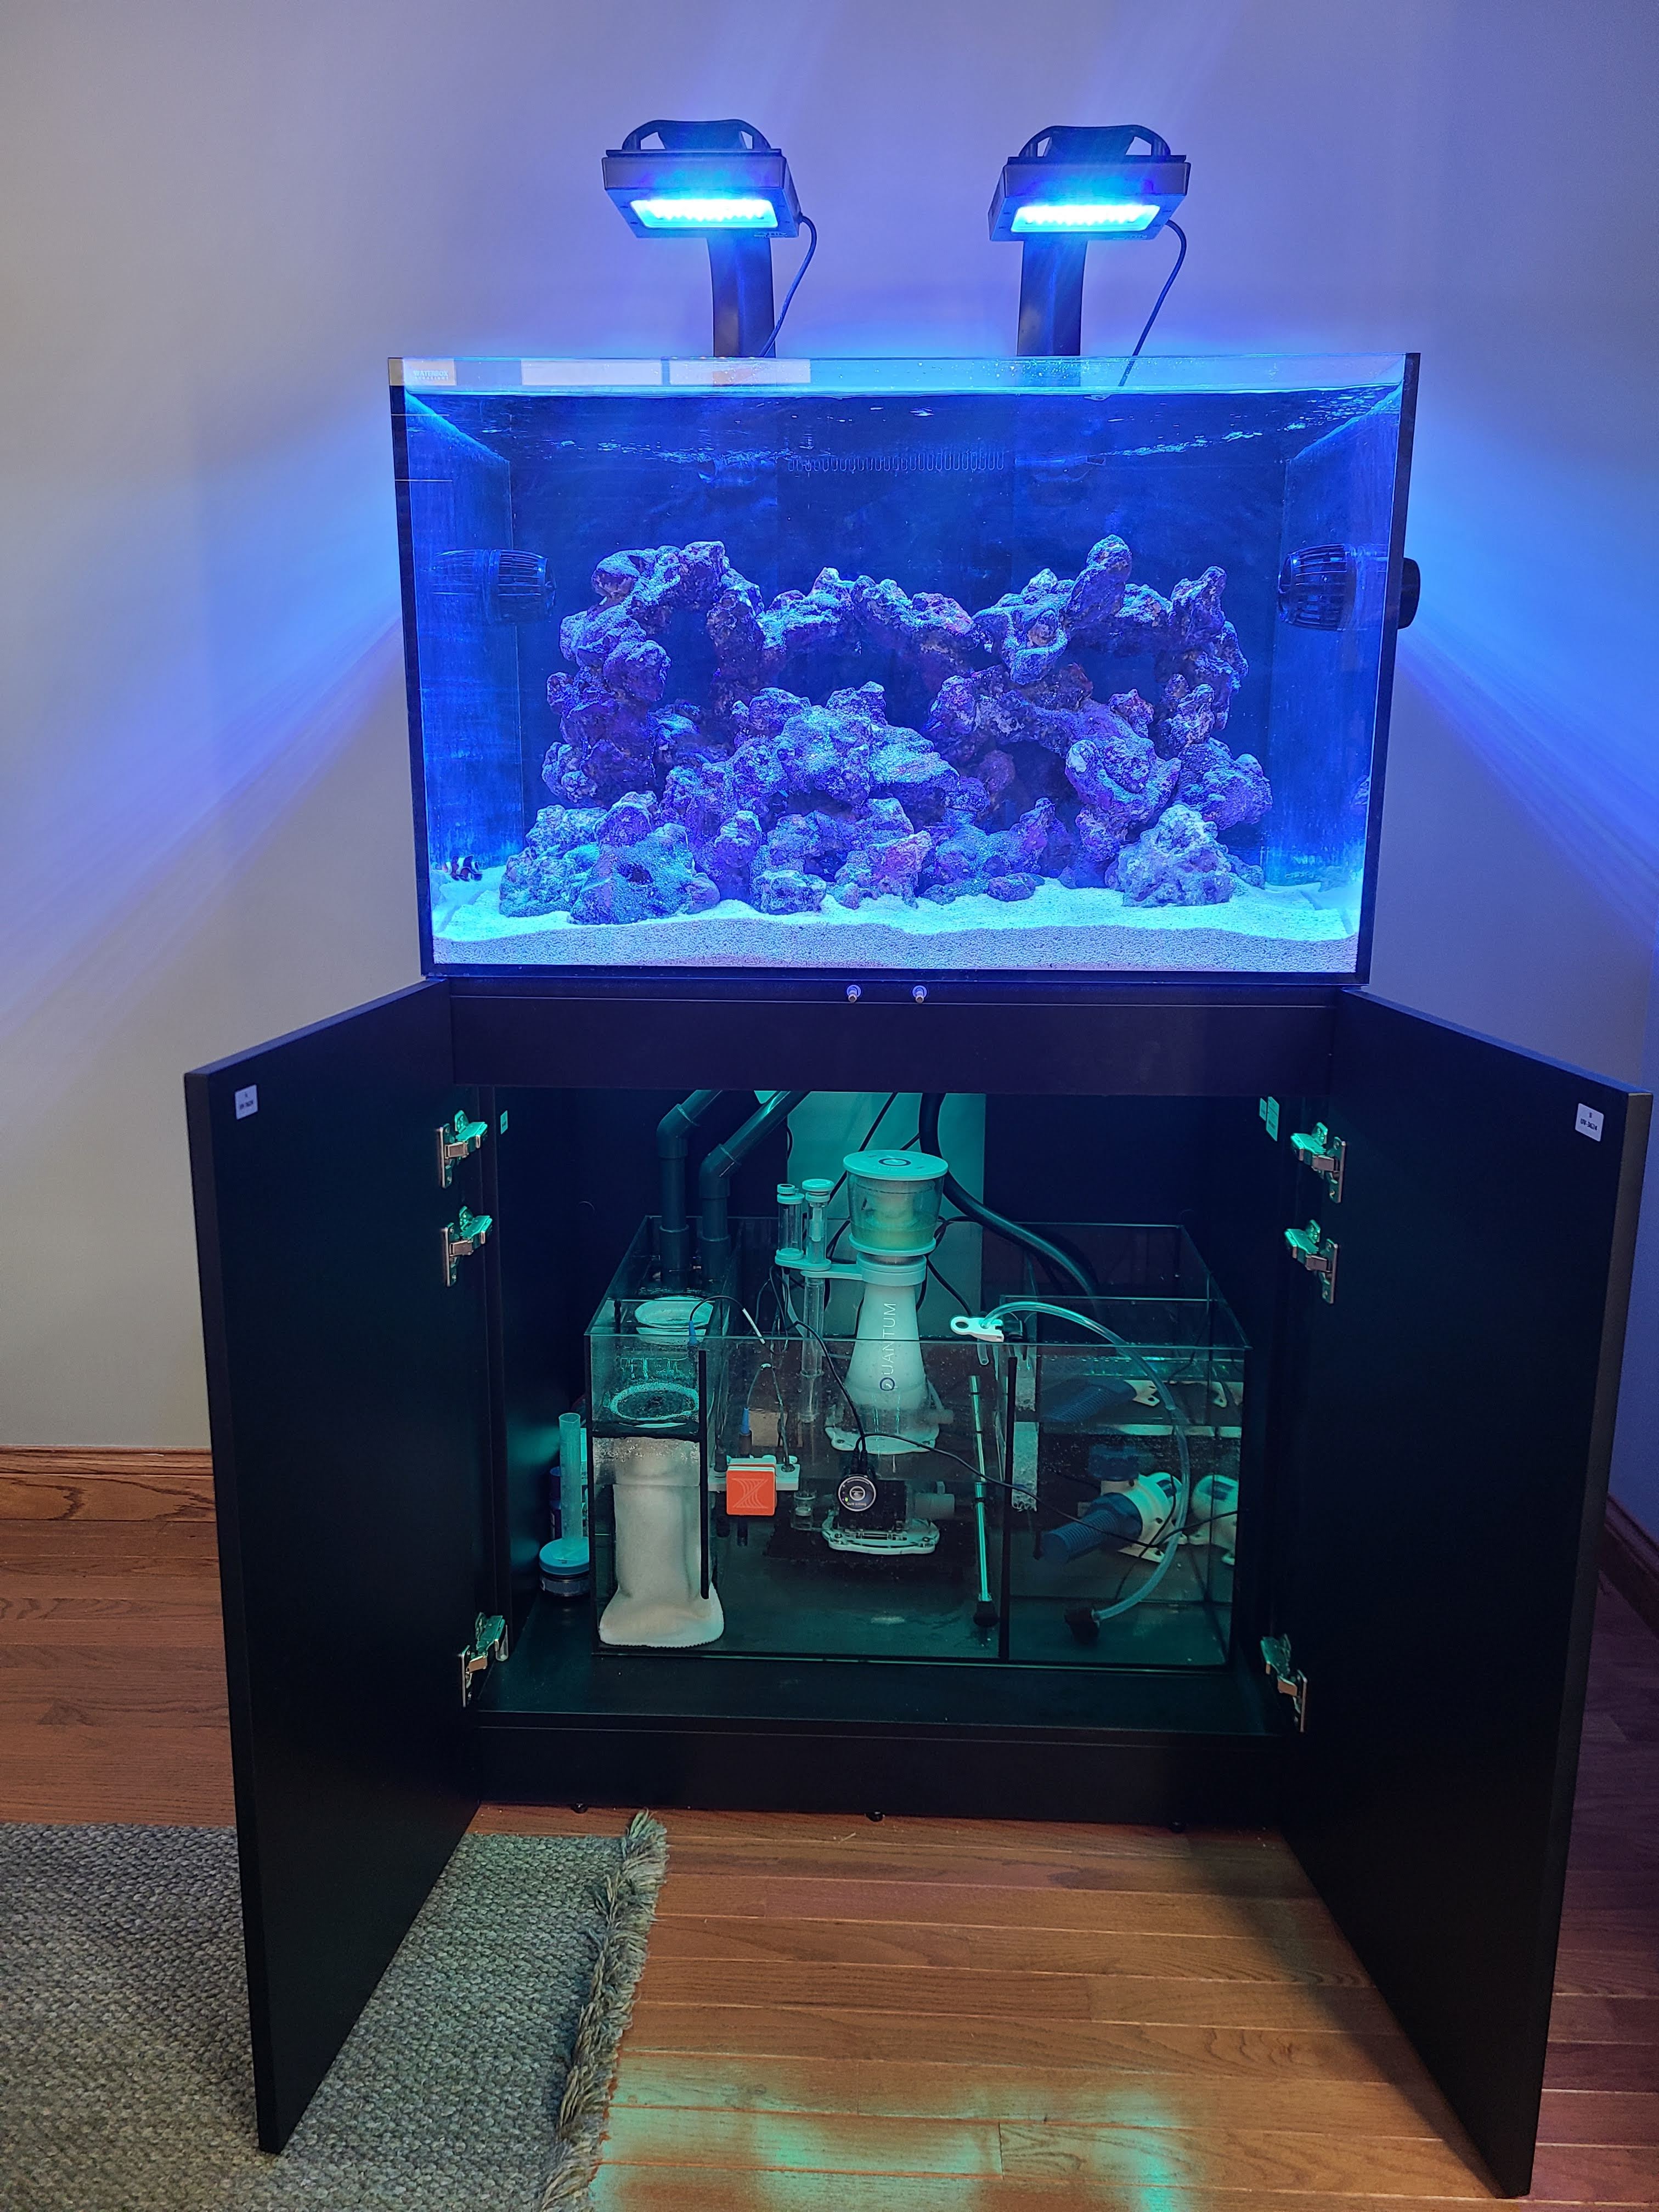
My aquarium is was all set up, the lights are on and everything seems to be running pretty well. The initial build post can be here: Waterbox 100.3 build
The only big tweak I have to made in the last weeks is that my Nyos skimmer was not adjusting very well and was sending the bubbles up too high. Some of this was just the skimmer needed the normal break in period. However the skimmer was still acting up on me even after a few days of continuous running. The big adjustment I made was raising the skimmer up one inch t match the manufacturer recommendation. I did this with a little eggcrate stand I found on amazon. It raised the skimmer exactly one inch and the skimmer is now really working well.
I had been patiently waiting to finally get some fish! I made a trip to my local fish store with the intent to get 2 bonded clown fish as the first inhabitants. The store had a few bonded pairs, but I kept coming back to a pair of Longfin Mocha Clown fish. These are captive bred designer clown fish that originated from Sea and Reef Aquaculture and the fishstore had a beautiful pair.
This was information from the Sea and Reef site on the creation of this Longfin Mocha clownfish.
The creation of our Longfin Mocha Clownfish
The mutation that created our longfin clownfish came from a single fish. In December 2013 our Hatchery Manager Brandon Weik was looking into a tank of several thousand Black and White Ocellaris (also called Darwin Ocellaris). He spotted a fish that looked very different than his brothers (all clownfish are born male). It had long flowing fins and was getting beaten up, probably because of its different look. The fish was isolated and later paired up. A story was published about our findings in Reef Builders in April 2014. You can read the article by clicking here.
Our Black and White longfin clownfish was paired up and shortly after the pair started to produce offspring. Unfortunately, less than 1% of the offspring produced displayed the longfin trait. For the last five years the Sea & Reef team has been working tirelessly on increasing the yield of longfin clownfish offspring and producing different variations. While the yield has increased, we are still not able to produce longfin clownfish in very large quantities so expect the release to be somewhat limited.
I brought these two home and started acclimating them to my tank's water.
And here they are exploring. They are inseparable and do everything together.
I'll give these two some time in the tank before seeing what I add next.
It's now been a little over two years since I moved from North Carolina to Indiana. I was reflecting on our moves throughout the years and realized I had essentially had some sort of fish aquarium at every house I had ever lived in. Before we moved to Indiana, I broke down and sold my saltwater tank and I have really missed the hobby. So here is what I am working on and where I stand to getting a saltwater reef tank set up again!
Choosing The Aquarium
I went back and forth on the size and aquarium I wanted to try based on previous learnings. It is kinda like owning a house, in that over time you realize what you like and what you would like to change next time. My last tank was a 125 gallon tank and it took up a lot of space. I wanted to have a bit of a smaller footprint. My last tank also was rimmed and had a unfinished stand and I must admit that a rimless tank is so much more aesthetically pleasing. My wife also put her foot down that the stand should look nice and not just a bunch of unfinished 2x4s. The biggest learning was that I wanted more of a plug and play system. On my last system, I drilled holes in the aquarium for the overflow, I built all the plumbing with PVC piping, I added a sump and pieced the system together one project at a time. I was a fun learning experience. but this time I am ready to just set a system up with all the pieces right at my fingertips.
I looked at so many aquariums to find a set up I thought I would like. The aquariums that I really liked were from Red Sea, Planet Aquarium and Waterbox. I read reviews and looked at many pictures from other owners. In the end I chose to go with Waterbox. Their aquariums are beautifully constructed and come with a stand, a sump and all the plumbing. Basically you can set up the aquarium, stand and have it plumbed all in one package.
The specific Waterbox aquarium I ended up ordering was the Waterbox 100.3 as it had the footprint i was really looking for.
I placed the order and waited for it to arrive which took about 6 weeks. The delivery process went very smoothly. I got a call from the freight driver saying he was on his way and he put the pallet right in my garage.
Once I unwrapped everything the crate for the actual aquarium is secured with screws and very well packaged.
The next step is assembling the aquarium stand and getting the aquarium set on the stand. The stand was well constructed and was easy enough to put together. There are plenty of videos that are on Ythat are even easier to follow than the printed instructions. A neighbor was nice enough to come over and help me move the aquarium from the garage onto the stand.
Adding the sump and plumbing was also very straightforward. Waterbox has a bunch of youtube videos that made the plumbing setup even easier to follow.
The Equipment
I was also working on acquiring all the other equipment I would need as well as pulling old equipment from my last tanks out of storage.
Return Pump
The return pump is the heart of your aquarium. Water overflows from your aquarium into your sump and then is pumped back up to the aquarium by the pump. I really wanted a silent sump and the ability to easily change the flow and chose the Ecotech Vectra S2.
Lights
I chose the Ecotech Radion XR15 Blue. Radion's come with a XR15 "Blue" model and a "Pro" model. The blues give a bit more of a blue hue while the Pros give a bit more of a white hue out of the box. I prefer the blue light for viewing a reef tank over the white, but it is mostly personal preference. People have success growing coral with either type. The RMS mounts also make hanging the lights a breeze.
Skimmer
I also wanted a very quiet skimmer and staying within Ecotech family I chose the Nyos 120.
Flow - Powerheads
Again keeping with on the Ecotech theme, I received 2 MP40 quietdrives to add to the system
Here is the waterbox sump, lights, skimmer and powerheads. My original shipment was missing one MP40, but the supplier quickly shipped me the second one.
Sand
I went with Special Grade "live" sand from Caribsea. When I did the calculation 80 lbs of sand (4 bags) was the recommendation, but once I added the sand to the tank I just used 60 lbs (3 bags).
Rock
I wanted to go with dry rock as opposed to already cured rock. I had some dry rock from my last tanks, but that rock had been through some high phosphate blooms and a really bad dinoflagellate outbreak over the years. So I figured it was good time to just start over. I went with the Caribsea LifeRock. I got ~80 lbs of rock that was a combination of the original,(40 lbs) shapes (20 lbs) and arches (20 lbs). I played around a bit with how I wanted the rock to look before putting it into the tank.
Controller
I had an Apex system set up on my last tank. It basically comes with a power strip and a controller that supports probes such as conductivity, temperature and pH.
Once everything is plugged in and the probes are are online the Apex controller connects with an app where you can monitor the water parameters as well as turn on/off any equipment that is plugged in.
Here is the apex app after I have everything plugged in.
Controller Board
The Apex power strip, the Apex controller unit, the S2 vectra pump and teh 2 MP40s all have units that need to go somewhere. I used an adaptive reef controller board to help organize all the cords and controllers.
Other Apps
The Ecotech family of products also has its own app called Mobius where you can control the equipment. I prefer going into APEX to control everything, but for initial setups the Mobius can get your your lights, pumps and powerheads scheduled with a template. I still use the APEX app to turn things on/off if needed (feeding, etc.)
I have set the MP40s to 60% flow on Reefcrest mode and the Vectra return pump to 75% constant. Changing the settings are very easy in the app. I did have to do a lot of updates to firmware for the equipment through the app and to try it multiple times in some cases, but once I got through the updates the app has seemed pretty stable.
The lights also have a way to set automated times, spectrums and ramping schedules. I am using the AB+ template for now.
Water
The water is the most critical piece of of any aquarium system. Most saltwater systems use RO water. You can usually purchase this from a fish store or make your own. In order to make your own, there are RO systems that will do the job and I am using a 5 stage RO system from Bulk Reef Supply. It has a TDS meter built in so that i can target 0 TDS output water.
Salt
Everyone has opinion on the best salt. I went to Tropic Marin Pro salt and have been targeting a 1.025 salinity. It mixes amazing! and does not have any residue at all. One note is that it does have a low alkalify. So far I am reading a 6.8 and would rather be around 8. So I will probably add some soda ash in the future to any water I make.
The Final Build
After getting all the supplies, adding the rock and sand and making the water, I filled the tank. I used a pump to pump in water from a big Brute 40 gallon trash can to the aquarium.
Here was everything up and running with the water added. I also added some LED strip lights underneath the cabinet to make for some fun lighting.
Cycling
Once everything is up and running, the patience has to kick in to cycle the tank. this is where the tank needs to build up bacteria that can convert Ammonia to Nitrite to Nitrate. In order to do this I added Dr Tim's Ammonia. I started with 12 mL of ammonia and ran an ammonia test. Sure enough I had a lot of ammonia in the system. I also added a bottle of Bio-spira which is nitrifying bacteria. This just helps colonize the tank.
I ran an ammonia test every day and sure enough after about 7 days I had 0 ammonia. At this point I added about 6 more mL of ammonia and after only 1 day it was back to 0. This let me know that I had bacteria that was successfully converting ammonia which is important because ammonia is toxic to fish. I also ran nitrate tests and it was pretty high so I did about an 60% water change and brought it under 8 ppm. In about 3 weeks I had a cycled tank with addition of ammonia, live sand, and bio-spira. I felt my tank was ready to introduce its first fish so stay tuned.
It seems that the great Saturn and Jupiter conjunction of 2020 even made mainstream media as a nice distraction from an otherwise dreary 2020.
There is a lot of info below, but the cliff note picture that I was able to get is here:
Jupiter and Saturn - Dec 20, 2020 - Celestron Edge 8 HD with Barlow and ASI294
Essentially Jupiter and Saturn formed a line through space with Earth so that both planets appeared to be right beside each other in the night sky. They were at their closest point next to each other on the night of Dec. 21, 2020. They had not been with this degree of proximity in over 400 years and over 800 years since humans were able to view them this close. That is because in the past when they would have been this close, the sun blocked the view.
Due to the rarity of the event I certainly wanted to get a picture. This conjunction will happen again in 2080 so my kids may see it again, but for me I think this was my only shot. Unfortunately on the actual night where the two planets were the closest, Indiana clouds covered our sky. However I was able get the scopes out a couple other nights and still see the planets coming together. Even then the conditions were not the best, but the clouds gave me a couple breaks to see this amazing celestial event.
I love events like this because it gets other amateur star gazers interested in the hobby. I remember starting out in the hobby of astrophotography and was so lost in what I needed to see something cool in space. I still have so much to learn, but I hope that by sharing my experiences I can give some info to help any newcomers to the hobby whether just for visual observation or taking photos. So during this event I took pictures with two different scopes and two different cameras just to give a flavor of how different scopes and cameras see the beauty of space.
If you want to just look at things visually you really just need a telescope, a mount and some eyepieces to get started. If you want to take photos then you need a few more things and below is a very simple primer.
Requirement 1 for Photographing Planets: Camera with video capability
Photographing planets is a bit different that photographing deep sky objects like nebula or galaxies. For a deep sky object you take a many long exposure pictures an object and then stack all the pictures. Planets though are difficult little buggers because the atmospheric turbulence make getting a good picture extra tough. But because they are so bright and you don't need long exposures to see planets, the solution is to actually take a video of the planet. Once you have a 20-30 second video at 15-30 frames per second then you actually have hundreds of pictures. Each frame of the video becomes a picture. Then you can run the video through a processing software like Autostakkert which splits the frames into pictures and stacks the best pictures together. So if you want to take pictures of planets you need to have a camera that can take video.
Here is an example of when I took a video of Saturn. You can see how sometimes the planet gets fuzzy and other times it gets a bit clearer. Getting perfect atmospheric conditions to get a clear photo is tough, but taking a video can help get lots of pictures so you can stack the best ones and discard the bad ones.
Two common types of cameras that many people use for astrophotography are:
DSLR: Many DSLR cameras have the ability to take videos. They can easily be attached to a scope to both take still pictures for deep sky objects or videos for planets. I used a Nikon D5300 as an example DSLR.
Dedicated Astrophotography cameras: One of the most popular cameras that have been coming on the market are dedicated CMOS cameras. Two of the most popular companies that make these are ZWO and QHY. There are so many of these cameras on the market now and it is hard to always figure out what to get. They come in monochrome versions and one shot color and are a topic all on their own. Some of these will do much better at deep sky objects while some are specifically better as planetary cameras, but many will do both. I use a ZWO ASI294 Pro and while better at deep sky objects can shoot video and is serviceable for planet photography.
Requirement 2 for Photographing Planets: Telescope
Planets are bright and many can be seen with the naked eye as bright points in our night sky. At he same time they are still tiny and require some decent magnification. Even a small scope though can see the rings of Saturn. It goes without saying though the bigger the scope the better for good pictures of a planet. I have two scopes to highlight the differences in what you can see.
The first is a 90 mm refractor made by Stellarvue. Refractors use glass lens and thus while they give exceptional views both visually and for photos, they get crazy expensive the bigger they get since making the glass for bigger scopes is harder. It becomes rarer to see super larger versions of a refractor scope.
The way to get a bigger scope for cheaper is to use mirrors instead of glass. There are many types of scopes that use mirrors and one of those is called an SCT (Schmidt Cassegrain). The SCT I used is a Celestron Edge 8 HD SCT. It is a bit more powerful than the refractor, but not as a user friendly due to being bigger and heavier.
Here, I was getting the scope ready and the focus dialed in for the night with a quick view of the moon that was up in the day sky.
Optional requirement: Barlow lens
In general, getting more magnification can help get a better view of a planet. One trick to help increase your magnification is to use a barlow lens. These are small lens that can be added to your imaging train and can help double or more your magnification.
Here is the Televue 2.5X Barlow lens I use. One one side is the T-ring that can go right on a camera and the other is the adapter that screws right on the Celestron Edge 8 HD SCT scope. It also can screw right into the ASI294 camera making it easy to add to the imaging train.
Now that we have the equipment we can take some videos!
Example 1: 90 mm Refractor (SV90T) with ASI294 Camera
On the night of Dec 9, 2020 Jupiter and Saturn were still a bit of distance way but they were getting closer. This is where a small refractor scope can get a nice wide field of the sky and fit both planets. As you get higher magnification you see a smaller piece of the sky and my larger scope would not be able to see both at the same time. Even besides planets there are many deep sky objects that take up big parts of the sky and these small grab and go refractors are the go to imaging scope. If you are thinking about getting in stargazing and astrophotography I would always say a good 80 mm refractor is the perfect scope to get and there are many choices on the market.
I just used the ASI294 camera in this example directly hooked up to the SV90T (90 mm refractor scope).
In this case I just took one frame of the video to get a picture.
The refractor definitely does not get crazy detail, but the wide field of view in nice as you can see both planets even when they were still a bit far away. While the planets are small, the refractor can still see the rings of Saturn. If you were using this scope for visual observation, a good eyepiece could get an better magnification of Saturn. This is the scope I used to visually to see the rings of Saturn for the first time in my life many years ago and it hooked me!! Even with the wide field picture if you zoon in you can see what you would see with the scope if looking at Saturn.
Example 2: Edge 8 HD (SCT) with ASI 294 Camera
On Dec 20, 2020, the planets were pretty close and I was able to fit both of them in the field of view with my bigger scope.
In this example I used the ASI294 camera and no barlow lens with the Celestron Edge 8.
The planets look a little bit bigger than with the 90 mm refractor. However they are still pretty small.
Example 3: Edge 8 HD with Barlow and ASI 294 Camera
Right after taking the video with no Barlow, I added the Barlow lens to the imaging train and took a new video. That Barlow is a nice way to get some added magnification. You can see the planets show a little bigger.
I took that same video and processed it through Autostakert and Registax to get the following picture which probably ended up being my favorite.
Example 4: Edge 8 with Barlow and Nikon D5300 camera
I missed the actual night where the planets where the closest, but got some breaks in the clouds on Dec. 22. In the case I kept the Celestron Edge 8 HD scope, but replaced the ASI294 camera with the Nikon D5300 DSLR camera. The Barlow stayed in the imaging train.
The DSLR shows that it can still get a decent video and picture. The same video was processed for the resulting picture.
One nice thing about the DSLR is there is usually a "5X" zoom feature that can use the camera to get even more magnification. The more you magnify the more the atmospheric conditions need to be perfect to get a good picture. I did not have great atmospheric conditions, but was still able to get a video of the planets in a much more zoomed state using the added camera magnification feature. I took the resulting video where I zoomed into each plant individually and processed the video in Autostakkert and Registax.
Here is Jupiter with the DSLR. Again a lot of atmospheric turbulence, but you can see the hints on the banding on Jupiter.
Jupiter - Nikon D5300 - Dec 22
The same process for Saturn using the DSLR zoom feature and then processed shows the rings quite clearly.
Saturn - Nikon D5300 - Dec 22
All in all, this was an amazing event. The fact that both planets got so close and could fit in the same field of view is so cool. The pictures some other folks in the hobby put what I got to shame, but there is something about taking a photo or seeing something in space from your own backyard that is always special.
If you get into photographing planets taking the video and processing the video is also a learning curve. I will not spend a lot off time here, but can just a give a primer.
Capturing and Processing Planetary Video and Pictures.
Step 1: Use software to capture the video.
If using a DSLR: My favorite software is actually BackyardNikon (or BackYardEOS). It was built to connect your DSLR to a computer and control it for imaging from a scope. Once connected it has a "planetary" button. Hit the button, focus the scope and then hit record. The movies will be saved to the computer. Link: https://www.otelescope.com/store/category/4-backyardnikon/
If using a CMOS camera then Firecapture is my favorite software. Again just connect the camera to a computer. Pick the planet you want to capture and you will see the live view. Once in focus you can record the video that will save to your computer. Link: http://www.firecapture.de/
Step 2: Process the video to individual photos and stack them.
The go to software to load your videos, pull out each frame a s a picture and stack in Autostakkert.
Just follow the three steps to get your final photo once you load the video.
Step 3: Clean the photo up
There are many ways to help clean the phot up a bit. Many people use RegiStax which can just take some noise out of the picture to make it a bit clearer. Link: https://www.astronomie.be/registax/
Load your stacked photo and then just use the slides to help denoise your photo.
Photoshop or Affinity are other software that can help with processing too.
If you ever get a chance to take a peek at the planets through your own scope or a friends one night it is something you will not forget.
Here were a couple other blog posts I did in the past on planets if you wanted to read more.