Monday, December 4, 2017

Setting up a saltwater fish tank - PART 2: Equipment

In part of one of my saltwater blog (Part 1), I went over the basics of getting a tank on the stand and the plumbing that goes along with it.   Before we fill it up with water there is some equipment you will want.

The following list are the products I used.  The brands are by no means the ones you should use, but will give an idea of the types of things you will need to get.

SUMP ITEMS

 There are a lot of items you will want in your sump.

1.  Heater

For a saltwater and reef aquarium you will need to maintain the water temperature.  I have my heaters in the sump so they are hidden and not in the main display.   My main heater is a 400 Watt Titanium Aquarium Heater by Aquatop for a 125 gallon tank.   I also have a small 100 W Titanium Aquarium Heater in the sump.  If my main heater were to malfunction I have a backup to hold over until I can get it fixed.  I like these titanium heaters because they are long lasting.  There are a lot of opinions on the temperature you should keep your tank and a lot of it depends on the fish and coral you will have.   I keep my temperature at 79 degrees F.  No matter what temperature you chose as your main temperature, stability is the key.  You do not want the water temperature to deviate too much through the day.


2.  Skimmer

In my opinion a skimmer is one of the most important things to have in your aquarium.   A skimmer is a piece of equipment that keeps your water clean.   Here is how a skimmer works.


I think a skimmer is very important and actually went a little bigger than needed.  There are many skimmer brands and you can research the one that will fit your sump.  I chose to go with a Reef Octopus 202-S model.  The  biggest consideration in picking out a skimmer is to make sure it will fit in your sump since a skimmer can take up a good bit of room.  I placed the skimmer in the water drain section of the sump so that water coming down from the main aquarium will get skimmed before being pumped back up to the main tank.

The reef Ocotpus model I used is rated for 265 gallons and I have only a 125 gallon tank.  I personally prefer to go a little big on the skimmer because it plays such an important part in keeping your water clean.  Here is what the model looks like.   


To operate a skimmer you plug it up and use the knob to adjust the water level.  For this skimmer you turn the red know and water level rises towards the collection cup.  The water will be full of bubbles and I take the bubble line about half an inch from the top of the collection cup.   It will be personal preference on example where you want you water level to be depending on if you want a light or thick skimmate. 

3.  Return pump

As your water drains to the sump and gets skimmed it moves through the sump and gets pumped back up to the main tank.   You will need a pump to to get the water back up.   I started with a generic outdoor fountain/ fish pond pump.   It only lasted 2 months before the motor played out.   I needed to replace it quickly and after doing a little research I decided on a Jebao pump.   The particular pump I chose was the Jebao DCT-8000.  The rate or flow of water draining down in your sump depends on the flow of water going back into the main display.   You want a  good bit of turnover so be sure the pump you chose can push enough water up to maintain a good flow.  Remember the higher you have to push water up, the lower your flow rate will be for the pump.  


I again went a little bit bigger than I really needed too, but I wanted to have a pump that had power.  The nice thing about this pump is it has a controller to adjust how much water it is pushing.  I run this pump in a 125 gallon at half power.

4.  Reactor

When I first started my aquarium I did not have a reactor and I do not think this is something you need at the very start.    However I am a firm believer that you will eventually want this once your tank is established.   As your tank matures there are certain chemicals that build up.  One of these is phosphates.  As phosphates build up, they are fuel for algea.  I ended up with a bad algea problem at one point and figured out it was high phosphates.  A reactor can be used to help control phosphates.  You add a procuct called GFO that binds phosphates.  Your reactor has a small pump that pumps water through a column of GFO at a very low flow rate.  I have a dual reactor which means one column has GFO for phosphate binding and the other reactor has carbon.  The carbon helps with any smells and keeps the water clear.   I have the reactor right in the middle of the sump.  A small pump pumps water through the GFO column, where it then goes throguh the carbon column and finally flows back into the sump.   I change the GFO and carbon every 2-3 weeks.  It is a very efficenit system to keep phosphates in check and I recommend setting on up 

There is a nice site called bulk reef supply and it has a dual reactor kit that also includes all tubing and the pump.  There are alternative reactors, but this kit includes everything you need including all tubing.  I haven't found a more user friendly setup if you want convenience.


The GFO and carbon can be found at this site or your local fish store as well.  


5.  Autofill

Evaporation is your enemy with a fish tank.  I do not have a lid on my tank so that I have better oxygenation and so my lights have better penetration.  however this means I get a lot of evaporation.  the good news is that salt stays in the tank and only water is leaving.   so when topping off the water you will use freshwater.   Because you have a sump the water level in your main tank will stay constant.  The water in your sump will go down each day depending on the evaporation in your house and this changes in winter vs summer and low humidity vs high humidity.   I mark the level of water in my sump and always keep the water at this level.   You can manually add water each day to back to the line, but the easiest way is to automate this step.  I use SMART ATO (Intelligent Aquarium Automation) by Autoaqua which is just a small sensor and pump.  The sensor goes in your sump at the water line where you want to maintain.  The pump I put in a separate 10 gallon aquarium full of freshwater.  As the sensor picks up that the water is low it tells the pump to add water.  This keeps the water line constant throughout the day with you have to do anything except keeps the small freshwater supply filled up.  10 gallons of freshwater lasts me about a week.


Here is the magnetic sensor right at the water line you want to maintain.  Once it senses water below the line, it will pump water into your sump to fill it back up.  


6.   Filter Sock

As water drains into your sump from your main tank, it is preferable that the water is filtered.  This is just another way to help maintain good water conditions.  The filter is a type of mechanical filtration that catches a lot of the big stuff like algae or chunks of food.   The filter is called a filter sock and is where you send your draining water.  I try to replace this sock once a week although sometimes I get lazy and only replace it every two weeks.


The next picture shows my drain lines going into the filter sock.  The black piece is a filter sock holder that has two holes already made for the tubing.  It just hangs on the side of your sump and holds the filter sock in place.  This is another great addition.  


Here are the all the supplies put together in the sump. 


And here is the bigger view where you also see the second tank holding the top off water.


MAIN TANK ITEMS

1.  Circulation pumps

In the main tank the main piece of equipment you will have are your circulation pumps.   The ocean is constantly moving with currents and your aquarium should be no different.  There are so many circulation pumps out there.  If you want some really fancy pumps then look up the vortech pumps.   I chose two Hydor pumps rated at 1350 gph (gallons per hour).  So far these pumps have handled the work load well.


Here is the pump in action.


2.  Lights

The other huge piece of equipment you will need are your lights.   This may be one of the hardest decisions to make.   If you are going to have coral you need good lights.   The golden standard of lights for years for reef aquariums were metal halides.  The downsides of them is they are expensive and they run very hot!   So you have to have good cooling.  They also use a lot of electricity.  You still cannot go wrong with metal halids, but with the introduction of LEDs you can have a cooler and cheaper option.   I decided to go with LEDs.  Once you make the decision of metal halides vs LEDs, then you have to figure out what LEDs you want.  Once you start looking at your options you will see two categories.  There are some name brand LED systems that are very high quality but with a high price tag.   some names are Radion or Kessil.   then there are your "Chinese Black Boxes".   these are cheaper LEDs manufactured for cheaper, but sometimes quality can be suspect.   I did go the Chines black box route, but chose what i think is one of the higher quality companies offering them.  I used SB Reef Lights for my lights.  You can see how many "boxes" you need based on your tank size at their site.


Lights are something you do not need for the first few weeks that you get your tank up and going, but you will want these in place and working before we get to the point you add fish and coral. 

Here are the lights hanging and in action:


3.  Netting

I chose not to have lids on my tank.  Some people like a lid as it helps limit evaporation.   The other downfall of not having a lid is that many saltwater fish are jumpers.  Therefore I recommend a net of some type to help prevent you from losing any fish.  This is not something you need to do immediately.  We still have a bit of time before we add our fish.

The kit I used was a DIY netting kit form Bulk Reef Supply.  They have kits for rim and rimless tanks.  It took about 30 minutes to put it together for my tank.


Here is what it looks like once you put the pieces together:


Next time we will talk about getting your water, rock and sand set up and cycling your tank.   Almost there! 


Monday, November 13, 2017

Science for Kids: Chromatography and Precipitates

I love when I get a chance to show off science at a school or organization.  When it comes to finding these engaging activities the internet can always be a great source of inspiration.  But as often happens I rely on the awesome people I work with for ideas and activities.    I can't even put into words how working with such inspiring colleagues makes STEM outreach so fun and exciting.

I say all of this because I was invited to go by Davis Drive Middle School in Cary, NC to work with a chemistry club.   I was looking for a new activity since these kids had already seen most of the activities I had in the toolbox.   I was talking to two people I work with and just like that we had two projects ready to go.

Home Chromatography

The first thanks for this activity goes to Marie.   Marie has developed a great exercise to teach chromatography while also introducing some basic practice in pipetting.

The kids received a basic intro into chromatography.


Before the we actually did the chromatography exercise the kids needed to know how to pipette only 3 ul onto the chromatography filter paper.   So we had some food coloring and pipettes for everyone to practice using a pipette.


Here were the pipettes they got to practice with.


In groups they practiced setting the pipettes to the right aliquot setting and pipette food coloring on a practice sheet.  The sheets they were practicing with looked like this:


And the practice in action:


After had pipetting down, we moved on to doing the chromatography exercise.  Each group had blue, yellow, and red food coloring and the then two tubes of a mix of colors (mystery tubes).  There task was to see what colors were in the mystery tubes using chromatography. 

In this exercise, salt water (mobile phase) would move the food coloring up through the filter paper  (stationary phase) and the colors would separate. 

Here the kids got super excited to see the filter papers get added to the salt water.


The results were beautiful!


The summary of all the above exercises are:


Precipitates


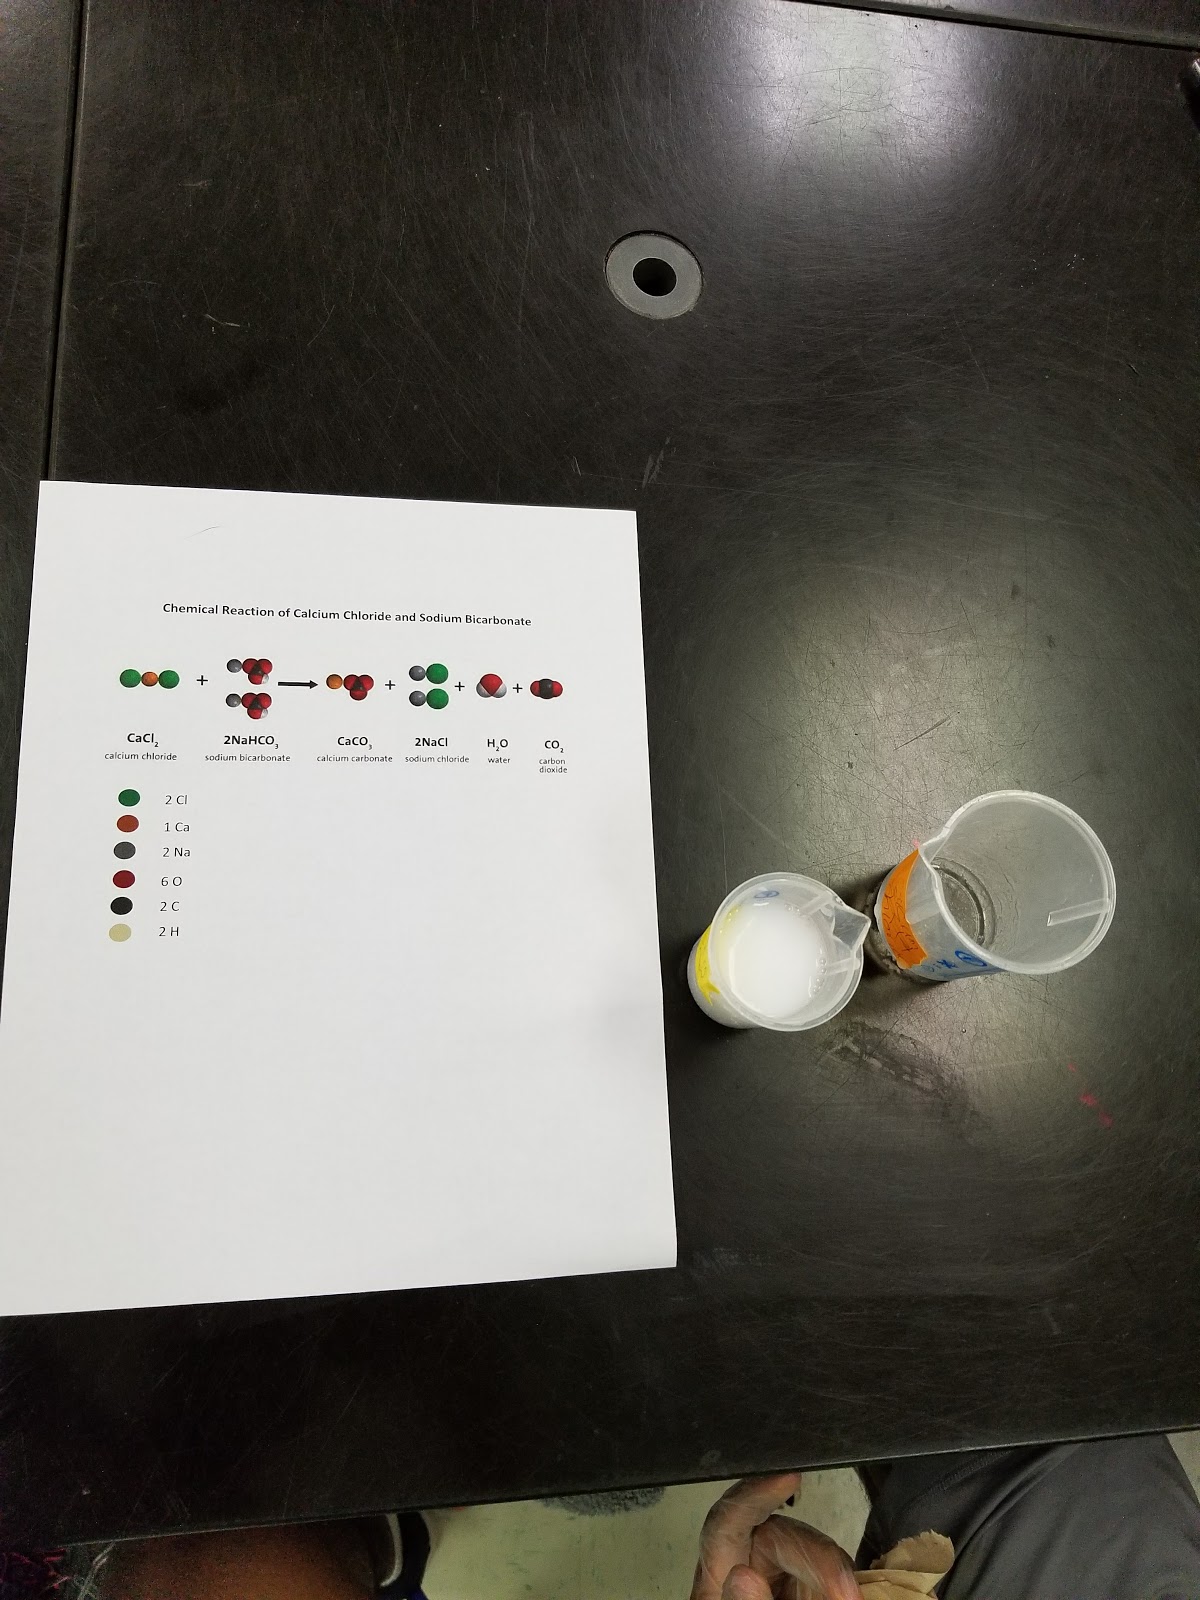
After we finished the pipetting activity,  Jun talked about precipitates.  When you mix two chemicals sometimes a precipitate will form.  Jun worked out a simple experiment for the students to try it out.

We mixed Calcium Chloride with Baking Soda.  This causes a reaction in which salt, carbon dioxide, and water are formed as well as calcium carbonate.  Calcium carbonate is basically chalk.   So once the mixture was mixed there were bubbles forming which was the carbon dioxide and a lot of white stuff which is the calcium carbonate.


Here is the procedure as well as the reaction.


Thanks Davis Drive for having us!


Monday, October 30, 2017

2017 FFA Convention: Meet the next generation of leaders and Agvocates


There are some days where we can all use a little inspiration and even hope in our lives.   I look at the headlines and I see war, wild fires, natural disasters, and a whole host of things that make us all worry about the future.   Well I got a transfusion of inspiration and hope at the yearly FFA convention held in Indianapolis, Indiana.   I knew of the FFA (Future Farmer's of America) when I was in high school, but it was an organization I never joined.  However over the course of 3 days I have come see that organization is a force to be reckoned with as it prepares and builds leaders not only for agriculture, but for all aspects of life. 

As I came down the escalator at the airport there was a big sign welcoming the FFA.   This was my hint as to how big this conference was going to be.  The motto for this year is "I CAN, I WLL" which I absolutely love. 


The FFA literally takes over the downtown of Indianapolis for a few days.  Everywhere you look you see blue jackets.    On the back of those jackets is the state along with the high school, county, or other local area each student is from.   I was fascinated all week on studying the backs of hundreds of jackets to see how far and wide the FFA, and our US farms are spread.  Actually all the states and territories were represented at the conference except the US Virgin Islands.   My colleague and I got into a competition to get autographs from all the states.  I lost since she got every single signature (Next time Brittany!).   But I met someone from almost everywhere as well.


I was at the FFA to represent Bayer CropScience with an awesome team.  We had a beautiful booth surrounded by so many other brands.  Tractor Supply company was right beside us doing karaoke and dancing all week so we also had a lively spot.  Carhartt and Wrangler were also right beside us.   And of course Monsanto, Syngenta, Dow and many others were all representing their businesses and showing these future leaders the types of opportunities available for them.


Besides sharing general information about Bayer CropScience we focused on information about bee health.  We also wanted to share how important it is to Agvocate about agriculture in general.  We had a huge Agvocate wall for FFA members to help us fill up.   There were 5 "hands" and each person that visited our booth could choose 1 to throw on the board.  The choices were

MENTOR -  You love to teach!
LISTEN -  You are a great listener!
JOIN - You join communities to share and talk about agriculture!
SHARE - You use all the social media outlets like Snapchat, Instagram, and Twitter to Agvocate!
PROVIDE - You use political channels like writing your local government officials to Agvocate!


On day 1 our wall was starting to fill up and when we left on the final day the wall looked awesome.  The trends that showed up were we have lots of Mentors, Sharers, and Listeners.   There was a much smaller group of the FFA that were posting about the political route to talk about how to agvocate and illicit change within agriculture.   I found this intriguing.  From conversations there seemed to be a level of distrust among this generation of the government, but all the more reason to get involved.


Other companies were sharing the same messages about being an Agvocate.  And there were people (future leaders and farmers no less) talking about how good GMOs.   What a refreshing environment to be in!


Through the course of the week, I spoke to so many kids.   They were so engaged and well mannered.  We are talking about over 50,000 kids in Indianapolis and NOT ONCE did a FFA member come through not tell me thank-you or use yes sir.  This is how I was brought up in rural America and I could only smile and feel pride that this tradition of kindness and manners still survives throughout all of America.

As I talked to so many kids I would get involved in so many great conversations.  I asked a few of the visiting FFA kids if they would mind sharing their impact statement or what inspires them.   Here are just a few snippets of the type of leaders we have coming to help lead this country in agriculture and other parts of our society. 


Doster Harper

"I plan to research beekeeping efforts to increase the sustainability of our environment and the world"

By the way at the very end of the conference Doster visited the booth again.  He said his adviser asked each member of his group to go back and get a picture with their favorite booth.  Doster, thanks a lot for making my day when you visited me again!


Allie Julian

"I had an amazing ag teacher and she made all the difference.  She told me I had potential and I believed her!"


Zach Jacobs

"I want to be the voice for farming on capitol Hill and help bring a positive view to agriculture."

By the way, GO HOKIES! Zach!


Graceyn Newland

"An impact I would like to make on agriculture is educating the public about the industry and the people supporting it through social media.  As the reporter of my (FFA) chapter, it is my passion to use the up coming scene of social media for educational purposes.  Social media is the new way to reach and audience and I would love move than anything to seize the opportunity and make a difference to ensure the stability of agriculture as we progress.


Shane Stubblefield

"An impact I would like to make is to close the information gap between producers and consumers to create a better understanding of agriculture and its crucial role in feeding the world."


Dalton Beasley

I would like to alter crop genes to where pesticides are obsolete."


Bailey Morell

"I want to start a career in Ag law in order to promote the Ag industry from a positive perspective and from someone who has a personal tie to the ag industry."


Zannah Tyndau

"Coming from an agricultural family and growing up on my family's farm, I have seen the importance of agricultural advocacy.  I aspire to become a lawyer to voice my opinion in government and stand up for those who work to food on my plate 3 times a day.  I will have an impact on ag by advocating for agriculturalists in government and politics."


Makenzie Snyder

"I've grown up on a farm and seeing our family transition to GMO crops, the impact has been immense.  I've spent so much time looking into GMO processes and impacts on the world.   I want to be part of that impact, making more and more food for our growing world.  I am a strong advocate for GMOs and everything involved."


Aleyana Boothe

"I would like to research and communicate what I learn about things happening in the environment.  I believe that the knowledge is power so if I can teach and make people aware of anything then they can use what they learned to educate others.  I would like to use education and use technology to impact the future of agriculture. 


Grace Holzer

"I hope to communicate to and educate the public about the agriculture industry.  I will do so by utilizing social media and the tools of broadcasting.   My goal is to teach them about the past, present, and future of Ag!"


Lynnsey Winchell

"I hope to bring passion back to the industry.  Many times we are caught up in the money and the politics.  Remember why we continue and why we continue regardless of the struggles, both mental and physical.  We love what we do,  so remember it is worth it.  Stay strong to your beliefs and in the beliefs in the society we live in today.  For I believe that American agriculture can and will hold true because of the passion we hold in our hearts. 


I cannot even begin to describe how impressed I was with the FFA and it members.  This includes the advisers who took the time to help get these kids to their destination.  In the majority of cases large groups were driving.  This was routinely a 6-14 hours drive.   The organization is a really a student led and it was running better and more organized than some bushiness I have seen.  I will forever cherish my time at this convention and the conversations I had with these kids and my other Bayer Colleagues.  I can't wait to try and touch base years from now and see where they are.


Monday, October 2, 2017

Setting up a saltwater fish tank - PART 1: Tank, Sump and Plumbing

Many years ago, I had a 55 gallon freshwater tank that I decided to turn into a saltwater tank.  I kept it pretty simple with mostly fish and a couple coral.  We then had our first child and decided to move to a new house.  I sadly tore everything down, sold my fish and coral, and missed the hobby.  Fast forward 3 kids and almost 10 years later and I decided I wanted to get back into the hobby. 

I quickly learned that I had forgotten everything I remembered about the saltwater hobby.   I read so much and tried to piece together what I would need to get, but it took time and a few mistakes.   So I am going to try and capture how I set my tank up in the hopes that other's who may want to get into the hobby can learn from my mistakes and learn what worked as well.

1.  A TANK AND STAND

I was taking my time on finding a tank.   Eventually I found a tank that had never even been used on Craigslist along with a stand.  The tank is a 125 gallon tank (72" x 18" x 24") and the guy I bought it from gave me the stand he had built.


2. SUMP

This tank already had 2 pre-drill holes and two overflow boxes in each corner.  Every tank can be different in how water will drain so I was lucky in that mine was already set up.   Once you figure out how your drains will be set up, the next thing to figure out is what your sump will look like so you can then design the plumbing.   For a saltwater tank you want the water to drain into the overflow boxes(or drain system you have on your tank),  drain into a sump (just another tank) and be pumped back up into the tank.     Sumps are just another tank that have compartments to place different pieces of equipment.   The sump hides all the equipment you will use as well, cycles your water, and adds more gallons to your system.  The bigger your system, the easier it is to keep it stable. 

 I have to say at this point I did not know how to proceed on building a sump.  This is where I advise go talk to people in the hobby.  I went to my local fish store, Fintastic in Cary, NC and they were a huge help.  In fact they built my sump for me.  We chose a 55 gallon tank with a 3 compartment design.  This is what the design and final sump looks like:


There is a lot of stuff in the sump.  I will go through all of the equipment in post Part 2.     As for the sump itself, the guys at Fintastic did a great job.  If you want you can build a sump yourself or even buy one already made.  When I was pricing sumps, it is much cheaper to build one yourself as opposed to buying one  The only real work you need to do is add baffles to make the chambers.  These baffles are just glass or Plexiglas that you will need to cut and glue in place.    In my case I have three chambers.   The baffles are placed in groups of three to keep bubbles from forming as the water moves from left to right through the sump and eventually pumped back up to the main tank. 

There are a couple of things to think about when building a sump.   The first is make sure it will fit the equipment you will place in the sump.   The other thing to remember when choosing a sump is to chose one that will not overfill in the case of a power outage.  When everything is set up and power is running, water is going to drain from the main tank, go through the sump and be pumped back up to the main tank.  When the power goes out, the return pump stops working so water drains to a certain level in the main tank, but is not pumped back up.   This means your sump will collect more water than normal so just make sure it can hold that extra water.  When I lose power, my 55 gallon sump fills about halfway up.

3.  PLUMBING - DRAIN LINES

We now have a tank and a sump and so the next thing to do is plumb your tank so you connect the two.  First decide where you are going to locate your sump underneath the stand.  This will help you decide where any pipes you run will need to go.  In my case I put the sump all the way to the left side underneath my stand. 

In my case I have two pre-drilled holes in each corner of my tank with an overflow.  The first plumbing adventure is to take piping from each hole down to the very left side of my sump.  The first chamber of my sump is where I will have water draining from the main tank. 

This is where you need to make a a big choice.   You can use flexible tubing or you can hard plumb with PVC pipe or you can use a mixture of both.   I chose the latter to mostly use PVC pipe with some flex tubing. 

No matter which type of piping you choose, you need to get bulkheads to be able to connect your piping to the aquarium while keeping any water from leaking out of the holes. 

A bulkhead looks like this:


There are also strainers you can add to the water side of your bulkhead if you wish.   This is how you attach a bulkhead to your tank.  Put the threaded portion through the hole.   The rubber gasket should be on the water side.   Screw the nut on the outside of the tank hand tight and then screw it another quarter turn with pliers.   DO NOT OVER TIGHTEN!!


After the bulkheads are in you can start running your drain pipes.   I used 1" PVC pipe to go from my bulkheads to my sump.  Through this process I made a couple mistakes and also did a few things that were serendipitous that I really recommend.

a.  Bulkheads and plumbing-  Pay attention.   The very first mistake I made was I installed the threaded part of the bulkhead through the tank hole and was going to attach the first piece of PVC pipe.  I cut my pipe, glued it and added an elbow.   After gluing everything I realized i had not put the nut on the bulkhead and the nut would not fit over the elbow.  CRAP!   I had to cut the pipe and start all over.  Of course the bulkhead was now ruined.


b.  Bulkheads - don't go cheap.   After the idiotic mistake above I needed to use a new bulkhead.  The guy I bought tank from had given me two bulkheads.  I had bought two new ones because the ones the guy gave me felt a little bit lighter and were older.  But since I wanted to get my plumbing done I used one of them.   Fast forward weeks later after I filled my tank with water and I came home to water leaking in a steady drip at my bulkhead.  I tried everything to fix it and could not.   I had to make another cut just like in the picture above, buy a new bulkhead and redo that piece of piping.   Come to find out I had a small crack in the bulkhead flange that was causing the leak.  I knew the bulkhead felt a little cheap and used it anyway.  I paid for that mistake.   

c.   Use Unions!!   -  If you go the PVC route use unions.  I had decided I would use unions so I could break the pipe down into smaller pieces if I ever needed to relocate my tank.    In reality when i had the 2 mishaps above the unions made it much easier to just replace piping up to the union and not replace everything!  Thanks goodness I had unions or fixing my mistakes would have been more time consuming and costly.

d.  Ball valves - I have two overflows, two bulkheads, and so I have two sets of piping for draining water to the sump.  On each set of pipes I installed one ball valve.   I don't know why I did this other than I had read one forum post that someone did it and thought it looked nice.   Once my tank was up and going, the water draining into one of my bulkheads was making a terrible gurgling noise.  It was loud enough to drown out the TV when it was on.   I started reading about fixes and the first thing I saw was to use a ball valve to help eliminate the noise.  By restricting the water flow in your pipe to just what is needed to get the water through you eliminate the air going through the pipes.  The air is what is causing the noise.  I turned the ball valve just a little and the noise stopped!   Ball valves to the rescue!

e.   PVC pipe ends in flexible tubing.   -  I am glad I did this.   I have water going from the tank, through the pipes and into the sump.  I attached a small piece of flexible tubing the PVC pipe at the end which makes it much easier to divert water where I need to in my sump.   I glued a PVC tube adapter to the end of the PVC, attached a piece of flexible hose and used a clamp to make sure it is attached well. 


Drain Line Run #1:  This was the farthest run from the bulkhead to the sump.  You can see I have 2 unions and ball valve. 


Drain Line Run# 2:  This was just a straight shot from the bulkhead to the sump right underneath.


Drain Line Run # 2:  I used one Union and the ball valve is right at the bottom.   You can also see the flex tubing connected at the end of Run #1.   Run#2 is set up the same way (the flex tubing is not visible in the picture).


4. PLUMBING - RETURN LINE

We are now plumbed for water to drain, but we also need to be able to get water back up to the main tank.  The last chamber of my tank will house the return pump.   i again went the flex tubing and PVC combination route.

I have a piece of flex tube running from the pump and then connected to PVC.   For the reture line run I used 3/4" PVC pipe instead of 1".    I used flexible tubing first on the recommendation that PVC attached directly to the reture pump can cause more vibration noise than if you use flex.   The flex tubing attached to the return pump also lets me move the return pump around in the sump a little move and gives flexibility if the return pump breaks and needs repair.  And that is a story I will share in a future post. 

My design was return pump -> section of flex tubing -> PVC pipe.   As the PVC pipe comes up to the top of the aquairum I used a 90 degree elbow and connected loc-line to split it to Y and go back into the tank. 

I bought the loc-line supplies at Bulk reef supply.


Just use the Y fitting to connect the loc-line hose.  These loc-lines are easy to bend and move around.


The water return:   Flex tubing to the PVC with a union.  The union will help if I even need to take the system down or make repairs.   The loc-line is at the top and will take the water back in the tank.


The entire system after all plumbing and before water has been added.


I will go over all the equipment you need to get your tank running in Part 2.